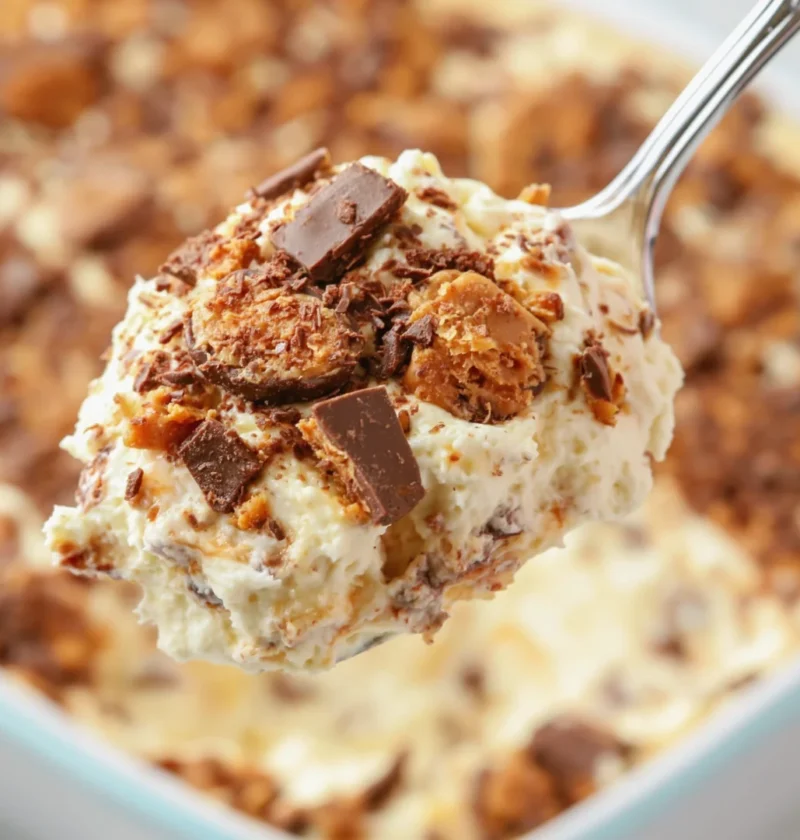
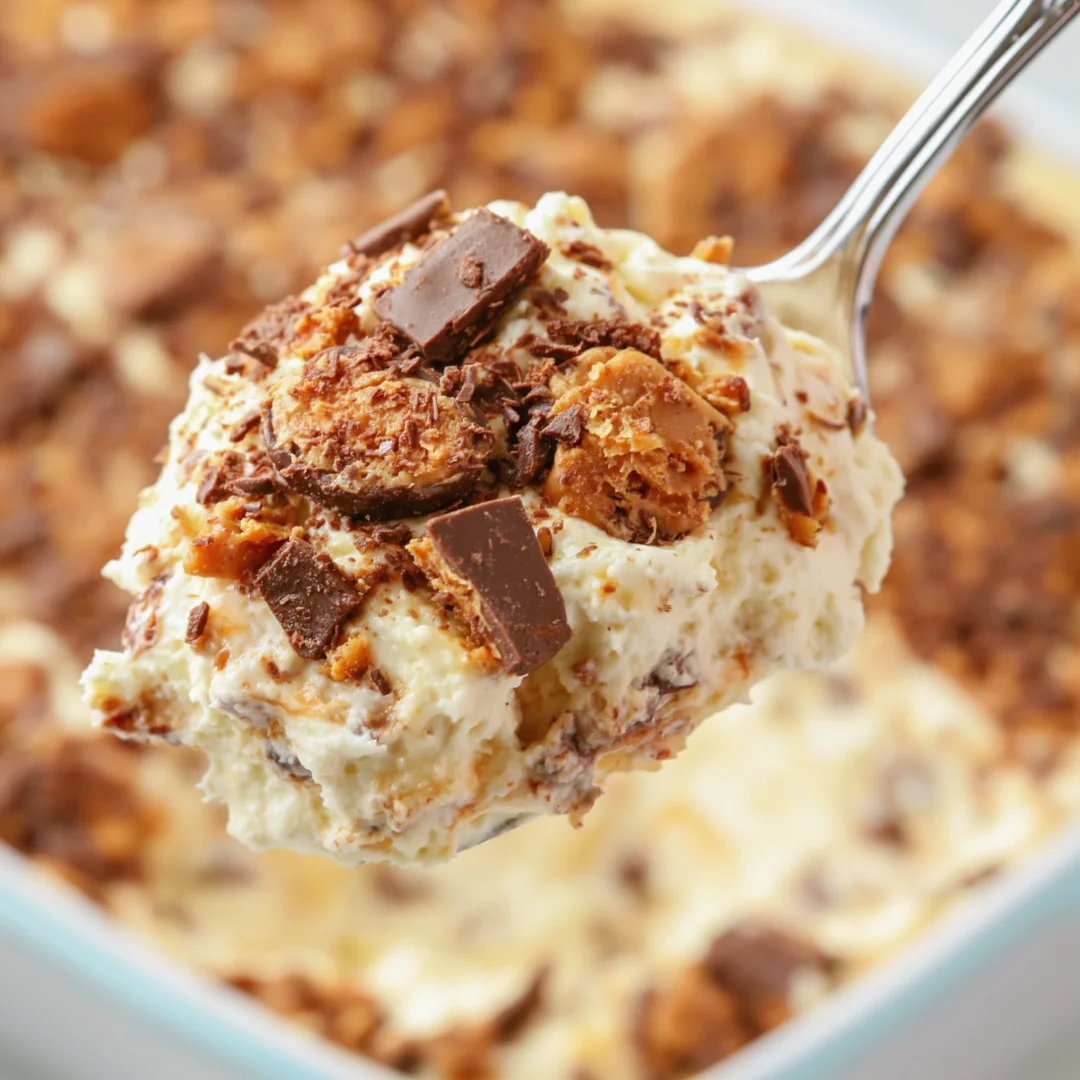
Indulging in a delicious Butterfinger Dessert is a sweet way to treat yourself and your loved ones. This dessert combines the delightful crunch of Butterfinger candy bars with creamy textures, creating a perfect balance that’s sure to please your palate. Whether you’re serving it during the holidays, a birthday celebration, or simply a family gathering, this dessert stands out for its unique flavor profile and eye-catching presentation. The combination of rich chocolate and smooth peanut butter creates a decadent experience that’s hard to resist. Plus, it’s versatile enough to work as a no-bake treat, making it perfect for those who want to whip something up quickly without turning on the oven. The layers of taste and texture in this Butterfinger Dessert will leave everyone craving more, making it an instant classic.
Ingredients
- For the Butterfinger Crust:
- 1 ½ cups crushed Butterfinger bars
- ½ cup unsalted butter, melted
- 1 cup graham cracker crumbs
- Note: For added flavor, consider using honey graham crackers instead of regular for a touch of sweetness, enhancing the overall taste.
- For the Creamy Filling:
- 8 oz cream cheese, softened
- 1 cup powdered sugar
- 1 cup creamy peanut butter
- 1 cup whipped topping (like Cool Whip)
- 1 tsp vanilla extract
- Tip: Using room temperature cream cheese helps achieve a smoother filling without lumps, ensuring a perfect texture for your Butterfinger Dessert. This step is crucial for a decadent and creamy filling.
- For the Topping:
- 1 cup chocolate chips, melted
- ½ cup crushed Butterfinger bars (for garnish)
- Suggestion: Opt for semi-sweet chocolate chips for a balanced sweetness or dark chocolate for a richer flavor. You could also experiment with milk chocolate for a sweeter profile.
Steps / Instructions
- Preheat your oven to 350°F (175°C). This ensures the crust cooks evenly and has the perfect texture, allowing it to hold up against the filling.
- In a medium bowl, combine the crushed Butterfinger bars and graham cracker crumbs. Pour in the melted butter and mix until well combined. The mixture should resemble wet sand, which will help it bind together when pressed into the dish.
- Press the mixture firmly into the bottom of a 9-inch pie dish to form the crust. Bake for 10 minutes until set and lightly golden. Remove from the oven and let it cool completely; cooling is crucial as it prevents the filling from melting into a hot crust, preserving the layers.
- In a large bowl, beat the softened cream cheese with an electric mixer until smooth, ensuring there are no lumps for a creamy texture that will complement the crunchy crust.
- Add the powdered sugar and peanut butter, continuing to mix until fully combined and creamy. The mixture should be thick but spreadable, making it easy to layer on top of the crust.
- Fold in the whipped topping and vanilla extract gently until the mixture is smooth and well incorporated. Be careful not to deflate the whipped topping too much; this step is essential for a light filling that melts in your mouth.
- Spread the peanut butter filling evenly over the cooled crust. Use a spatula to smooth the top for an even finish, ensuring every slice boasts the same delicious filling.
- In a microwave-safe bowl, melt the chocolate chips in 30-second increments, stirring in between until smooth. This method helps prevent burning and ensures a silky chocolate layer on top. You want the chocolate to be pourable but not too hot.
- Drizzle the melted chocolate over the peanut butter layer, creating a beautiful marbled effect that adds visual appeal and extra flavor.
- Sprinkle the remaining crushed Butterfinger bars over the top as a garnish, adding both texture and a burst of flavor that ties the dessert together.
- Chill the dessert in the refrigerator for at least 4 hours, or until set. This allows the layers to firm up properly and flavors to meld, ensuring every bite is delectable.
- Slice and serve chilled. Enjoy your delightful Butterfinger Dessert! The creamy, crunchy layers will surely impress everyone, making it a favorite at any gathering.
Tips & Tricks
For the best results, use high-quality ingredients, especially the chocolate chips and butter. They significantly enhance the overall flavor of your Butterfinger Dessert. If you’re looking for an even simpler option, consider making no-bake Butterfinger treats—just mix the crust ingredients and filling, then set them in the fridge. This no-bake option is perfect for those warm days when you want a quick and easy dessert without the heat of the oven.
When melting chocolate chips, be patient; overheating can cause the chocolate to seize up, ruining the silky texture you want in your Butterfinger Dessert. Stir frequently to achieve a smooth consistency. If you want to make this dessert ahead of time, it can be stored in the refrigerator for up to 3 days, allowing the flavors to meld beautifully. Check out our learn more about this topic for more ideas, including potential pairing suggestions that could elevate your serving experience. Check out our related guide for more tips.
A common mistake to avoid is not letting the crust cool completely before adding the filling; this can lead to a soggy base. Ensuring each layer is set before moving on is crucial for a beautiful presentation and texture. Moreover, if your filling seems too soft after mixing, refrigerate it for a short time before spreading it onto the crust to help it firm up, ensuring a perfect slice every time.
Variations
If you’re looking to customize your Butterfinger Dessert, try incorporating different types of chocolate chips—dark or even white chocolate can offer a unique twist that fits various taste preferences. For those needing dietary alternatives, consider using a dairy-free cream cheese and whipped topping for a vegan version that doesn’t compromise on flavor. You can also experiment with adding a layer of chocolate ganache for a more decadent experience or trying different candy bars crushed over the top for added texture and flavor. Other nuts or toppings can also be sprinkled for a personalized touch, such as chopped peanuts or a drizzle of caramel sauce to elevate the dessert further, making it truly your own.
Butterfinger Dessert
Indulging in a delicious Butterfinger Dessert is a sweet way to treat yourself and your loved ones. This dessert combines the delightful crunch of Butterfinger candy bars with creamy textures, creating a perfect balance that's sure to please your palate. Whether you're serving it during the holidays, a birthday celebration, or simply a family gathering, this dessert stands out for its unique flavor profile and eye-catching presentation. The combination of rich chocolate and smooth peanut butter creates a decadent experience that's hard to resist. Plus, it's versatile enough to work as a no-bake treat, making it perfect for those who want to whip something up quickly without turning on the oven. The layers of taste and texture in this Butterfinger Dessert will leave everyone craving more, making it an instant classic.
Ingredients
- 1 ½ cups crushed Butterfinger bars
- ½ cup unsalted butter, melted
- 1 cup graham cracker crumbs
- 8 oz cream cheese, softened
- 1 cup powdered sugar
- 1 cup creamy peanut butter
- 1 cup whipped topping (like Cool Whip)
- 1 tsp vanilla extract
- 1 cup chocolate chips, melted
- ½ cup crushed Butterfinger bars (for garnish)
Directions
Preheat your oven to 350°F (175°C).
In a medium bowl, combine the crushed Butterfinger bars and graham cracker crumbs. Pour in the melted butter and mix until well combined.
Press the mixture firmly into the bottom of a 9-inch pie dish to form the crust. Bake for 10 minutes until set and lightly golden.
In a large bowl, beat the softened cream cheese with an electric mixer until smooth.
Add the powdered sugar and peanut butter, continuing to mix until fully combined and creamy.
Fold in the whipped topping and vanilla extract gently until the mixture is smooth.
Spread the peanut butter filling evenly over the cooled crust.
In a microwave-safe bowl, melt the chocolate chips in 30-second increments, stirring in between until smooth.
Drizzle the melted chocolate over the peanut butter layer.
Sprinkle the remaining crushed Butterfinger bars over the top as a garnish.
Chill the dessert in the refrigerator for at least 4 hours, or until set.
Slice and serve chilled.
Nutrition Facts
Recipe Reviews
- ★★★★★
Excellent recipe!
Leave a Reply
Your email address will not be published. Required fields are marked *


Excellent recipe!