

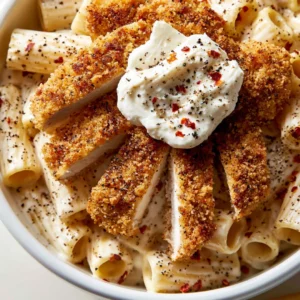
If you’re searching for a kid-friendly meal that’s quick, easy, and absolutely delicious, look no further than these Crunchy Chicken Tenders. This recipe combines tender chicken with a perfectly seasoned, crispy coating that will have your little ones begging for seconds. The contrast between the crunchy exterior and the juicy chicken inside makes every bite a delight. Whether you’re preparing a quick lunch or a family dinner, these tenders deliver on flavor and texture, making them a go-to comfort food for kids of all ages. Plus, you can easily customize the seasoning to suit your family’s taste. A little paprika can add a smoky touch, while garlic powder brings a savory depth. These tenders are not just tasty but also a healthier alternative to fast-food options. Let’s dive into the details of creating this ultimate family favorite!
Ingredients
- For the Chicken Tenders:
- 1 pound of boneless, skinless chicken breasts, cut into uniform strips for even cooking. Make sure the strips are about 1 inch wide to ensure they cook evenly and are easy for kids to handle.
- 1 cup of all-purpose flour, used for the first coating that helps the egg adhere. You can also consider using whole wheat flour for added nutrition and fiber.
- 2 large eggs, beaten until smooth to create a rich binding layer. This helps the breadcrumbs stick better and creates a deliciously rich flavor.
- 2 cups of breadcrumbs (homemade or store-bought), which provide the delightful crunch. For extra flavor, you can use seasoned breadcrumbs or panko for an even crispier texture.
- For the Seasoning:
- 1 teaspoon garlic powder, for a hint of aromatic flavor that complements the chicken nicely.
- 1 teaspoon onion powder, which enhances the overall taste and brings out the best in the chicken.
- 1 teaspoon paprika, adding a mild peppery flavor and a beautiful color to your Crunchy Chicken Tenders.
- 1 teaspoon salt, essential for bringing all the flavors together and enhancing the taste of the chicken.
- 1/2 teaspoon black pepper, adding a touch of spice without overwhelming the dish.
- Dipping Sauce:
- Ranch dressing or your favorite dipping sauce, perfect for complementing the tenders’ crunchiness. You can also try honey mustard or barbecue sauce for a sweet or tangy contrast.
Note: You can substitute whole wheat flour for a healthier option or gluten-free breadcrumbs for a gluten-free version. Using high-quality chicken and fresh ingredients will enhance the flavor significantly. You can learn more about this topic.
Steps / Instructions
- Prepare the Chicken: Start by cutting the chicken breasts into strips, about 1 inch wide. This ensures they cook evenly and are easy for kids to handle. Consider trimming any excess fat for a cleaner presentation. Also, consider marinating the chicken in buttermilk for an hour before breading to enhance tenderness.
- Set Up Breading Stations: In three shallow bowls, arrange the flour, beaten eggs, and breadcrumbs mixed with the seasoning. This setup will allow for a smooth breading process. Make sure each station is within easy reach to streamline your workflow. Using shallow dishes helps ensure even coating without wasting ingredients.
- Bread the Chicken: First, coat each chicken strip in flour, shaking off any excess. Ensure even coverage for a better texture. Next, dip it into the beaten eggs, allowing any extra egg to drip off, and finally, coat it with the breadcrumb mixture, pressing lightly to adhere. This technique helps achieve that desired crunch. For an extra crispy texture, you can double-dip the chicken by repeating the egg and breadcrumb steps.
- Preheat the Oven: Preheat your oven to 400°F (200°C). If you prefer a crispy result, consider placing a wire rack on a baking sheet to elevate the chicken tenders during baking. This allows hot air to circulate around the chicken, ensuring a uniform crunch and preventing sogginess.
- Bake the Tenders: Arrange the breaded chicken tenders on the prepared baking sheet or rack. Bake for about 15-20 minutes, flipping halfway through, until they are golden brown and cooked through. The internal temperature should reach 165°F (75°C). Use a meat thermometer for accuracy, ensuring the chicken is safe to eat. Keep an eye on them towards the end of baking to prevent overcooking.
- Serve: Once cooked, remove the tenders from the oven and let them cool slightly before serving. Pair them with your favorite dipping sauce, such as ranch dressing, to enhance flavor. Consider adding a sprinkle of fresh herbs like parsley or chives on top for a vibrant finish and a pop of color.
Tips & Tricks
To achieve the best results with your Crunchy Chicken Tenders, follow these expert tips: Check out our related guide for more tips. Preparing properly can make all the difference in taste and texture. Enhancing the flavors and textures will ensure your chicken tenders are crowd-pleasers every time.
- Storage: Store leftover chicken tenders in an airtight container in the refrigerator for up to 3 days. Reheat in the oven to maintain crispiness, as microwaving can make them soggy. When reheating, place them in a single layer to ensure even heating.
- Make-Ahead Option: Bread the chicken tenders ahead of time and freeze them. When you’re ready to cook, bake straight from the freezer for an easy dinner. This is perfect for busy weeknights when you need a quick meal without sacrificing quality.
- Avoid Overcrowding: Make sure not to overcrowd the baking sheet as this can lead to steaming instead of crisping. Providing space between each tender allows them to brown beautifully and develop that sought-after crunch.
- Seasoning Variations: Experiment with different herbs and spices, such as Italian seasoning or cayenne pepper for a spicy kick. You can even try adding grated Parmesan cheese to the breadcrumb mixture for added flavor and richness, enhancing the overall taste of your Crunchy Chicken Tenders.
Conclusion
These Crunchy Chicken Tenders are sure to be a hit at your dinner table, providing a deliciously crispy exterior and juicy chicken inside. This recipe not only makes for a great meal but also encourages kids to enjoy cooking and eating homemade foods. Engage your children in the cooking process for a fun family activity that builds their culinary skills. Try them out, and watch as your family devours them in minutes!

Crunchy Chicken Tenders
A kid-friendly meal that’s quick, easy, and absolutely delicious. This recipe combines tender chicken with a perfectly seasoned, crispy coating that will have your little ones begging for seconds.
Ingredients
- 1 pound of boneless, skinless chicken breasts, cut into uniform strips
- 1 cup of all-purpose flour
- 2 large eggs, beaten
- 2 cups of breadcrumbs (homemade or store-bought)
- 1 teaspoon garlic powder
- 1 teaspoon onion powder
- 1 teaspoon paprika
- 1 teaspoon salt
- 1/2 teaspoon black pepper
- Ranch dressing or your favorite dipping sauce
Directions
Prepare the Chicken: Start by cutting the chicken breasts into strips, about 1 inch wide.
Set Up Breading Stations: In three shallow bowls, arrange the flour, beaten eggs, and breadcrumbs mixed with the seasoning.
Bread the Chicken: Coat each chicken strip in flour, then dip it into the beaten eggs, and finally coat it with the breadcrumb mixture.
Preheat the Oven: Preheat your oven to 400°F (200°C).
Bake the Tenders: Arrange the breaded chicken tenders on a baking sheet or rack and bake for about 15-20 minutes, flipping halfway through.
Serve: Once cooked, remove the tenders from the oven and let them cool slightly before serving.
Nutrition Facts
Recipe Reviews
- ★★★★★
Excellent recipe!
Leave a Reply
Your email address will not be published. Required fields are marked *




Excellent recipe!